M.E.L.
(Mobile Electronics Laboratory)
It’s kind of a long story but between Mr. Destructo, my very destructive son#3 taking tools, disassembling things. Taking Operating System disks and reinstalling them on the wrong computers and locking me out of my own computer systems. That and having gone to one client several times and not having all the correct tools. And taking up way too much space in the corner of the master bedroom. I researched, pondered, and custom ordered my office. My fortress of solitude. My electronics and computer work area.
A 2008 Weekend Warrior FK 2100. A 21 foot Toy Hauler.

Only in my case, there are no toys. Only computers, tools, and electronic equipment. Oscilloscope, meters, stereo microscope, soldering iron, servers, computer workstations, printers, etc.
Has all the amenities needed for use as a home office or a on-site at a clients. No loading up the van with what I think I’ll need driving 450 miles then finding out I’m missing stuff. Plus it has a refrigerator, freezer, microwave, heater, air-conditioner, generator, stove, bathroom, shower, television, DVD player, FM Stereo w/CD player, storage space, a bed, and LOTS of empty space. I should note that the stove and plumbing features haven’t been needed as they haven’t been used as of yet all but all the other features are used.
Before buying it I played with all the various floor plans of different companies and settled on this one. I can haul a dune buggy 12’9” long and about 7’ 6” wide, AND a 20 foot long kayak! But I have neither. I ordered it with the bay window but automatically get two captains chairs. Not great quality but functional for now. It also came with a fold down bench seat/bed that I removed, as well as the double leg table that I also removed. The only sleeping area is a single manual drop down queen that I’ve left clearance for.
|
After pricing computer and electronics workstation furniture and found it too expensive I instead dismantled my 24 year old 7’ long 5’ wide L shaped computer desk. Built from tubular frame and laminated pressboard I bought more steel tubes and double sided laminated grey melamine to match my interior color. Total cost of rebuilding versus buying new was about 10 cents on the dollar. |
|
|
|
Cutting, sanding, painting, laminating. |
My assistant helping to mount the T-Moulding into the routed slot cut into the table top. |
|
|
|
|
|
|
We built a modern looking 5’x3’ deep contoured electronics workstation. Note the reinforced shelf above. |
And a 5’x3’ deep contoured computer workstation. Note the disc shaped monitor stands. The take minimal space, are bolted to the table as lazy susans and the monitors are anchored to them. They’re also covered in Velcro felt so the knick knacks travel in place! I even reupholstered the Ergo II office chair! |
My Kobalt Blue toolbox, is sandwiched between two bakers racks. One for parts bins, and another for printers. All inkjet but oversized for schematics, another for document printing with duplex, and a third for scanning, photocopying, and fax. |
|
|
|
|
|
There’s a third rolling bakers rack located between the two workstations used for servers, computers and a base for an octagon shaped four lane slot car test track with electronics. |
I’ve dropped the bed here for perspective! |
But then found the captains chairs would get in the way of the office chair, so replaced the bay window table with a narrower but longer trapezoidal table to make more space. |
|
|
|
|
|
Then found I need a bunch of my technical books. So I took a game table top from a game table I bought about five years ago that has been in storage and built a mobile, double sided, double adjustable shelf bookcase. Again pretty cool and gives me eight feet of bookcase shelf space and another work surface. |
I flipped the game top for the second picture of the backside. You can barely see it, but there’s actually a third adjustable shelf the size of the game top. Currently the animation disc is stored there. |
|
|
|
|
|
|
This is a view from the rear cargo door towards the front. |
This is from the front towards the rear cargo door. |


For transport the file boxes on the counter would drop to the floor. The bookcase gets rolled back and anchored into place just forward of the trailers wheel base. Attachment of a few bungie cords, and then off down the road I go.
The generator has already been useful as we had a power failure in town a couple months ago for about an hour and I merely kept working using the generator.
And yes this is 100% business related thus a full write off. Then of course maybe 99% if I decide to take a slight detour back from a client’s job site to stop by a river for the night and go fly fishing!
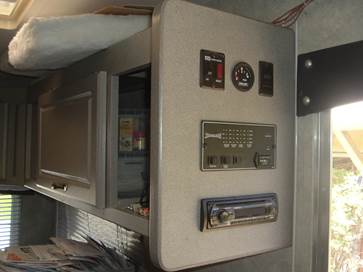
Well I’ve now had this office for a while now. Many renovations since purchasing it. Around the year 2012 I was coming home from my contract job in the Bay Area every weekend and I decided to replace the built in 12volt AM/FM/CD Radio with built in ceiling quad speakers with a Yamaha Cinema system. This meant routing wires from the former television cabinet, on the left side of the RV to the Radio on the right side.
|
|
|
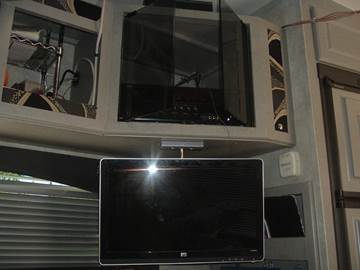
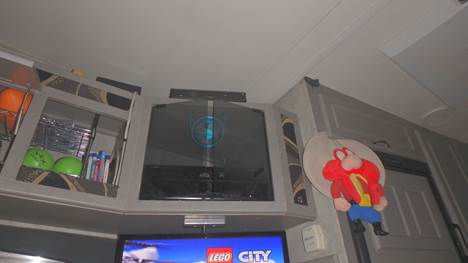
The Yamaha is shown in the cabinet above where the television used to be, and a Toshiba LCD Television is now hanging under the cabinet. You will note the wires in the upper left corner of the display now run in a track across the ceiling. Now comes the fun part.
|
|
|
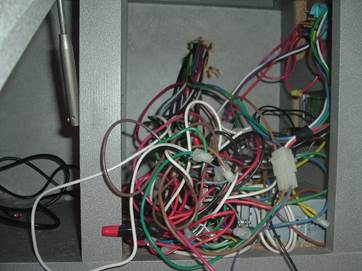
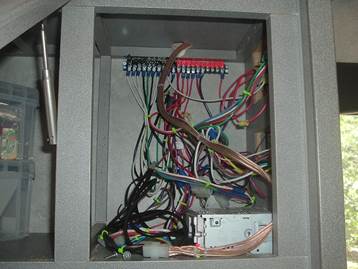
Almost all of the wires in the RV come together in a hidden
compartment in the cabinet shown on the left. A wire nest good enough for a bird
or a rat! I added color coded terminal blocks, and cleaned up the existing
wires as much as possible. So with that completed, now what to do?
|
|
|
|
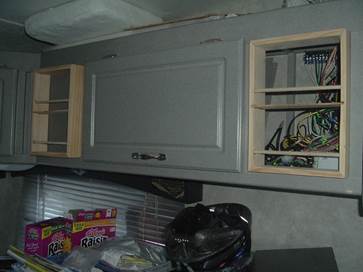
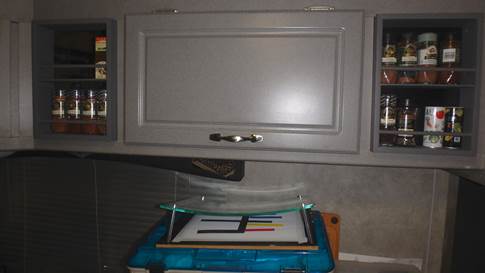
Custom build two spice racks of course! Replace the recessed panel board on the left with smoked Plexiglas (so the back area of the cabinet can finally be viewed) and the one on the right backed with black melamine to hide the new wiring.
Time for another Mr. Destructo story. Completed, the weekend over, I went back to the bay area for my job. I came home next weekend to find blown circuit breakers. Nothing worked and it kept blowing circuit breakers, which made no sense. Then a dark cloud came over me. I removed the right spice rack (which is the access) and to my horror I found someone color coordinated all the wires. Black with black, red with red, green with green, white with white. I should point out that there is no standard for ground and +12 volt when the RV was wired. Peek at the color of the wires on the wiring bus above. No schematics from the manufacturer, I had to trace every wire to its source. I had to personally talk to the creator of the RV control panel to find out how it was supposedly wired. Finally had it all back together. Generator worked, fuel tank, battery test, water heater, etc. but one thing didn’t work. It indicated a full water tank. What did I do wrong? Sat there for about 45 minutes pondering that question and that dark cloud came over me again. I went outside opened the tank drain, and out poured 100 gallons of water. It was suppose to be empty, but my son had also filled the water supply tank!
There have been other undoing of things he’s done but not to this magnitude.
Of course there was the power dolly incident. It’s another of my stories, but I’ll post it another time!
Some other simpler tasks such as all 12volt incandescent lighting had been replaced with LED lighting; much brighter illumination with a much lower current draw. Monitor swivel arm installation and other stuff.